In an attempt to shorten my lengthy emails to my clients, I’ve sent you a private link to this page just to explain more about how I deal with ceilings in basements. I may mention this more than once, but I am talented at creating optical illusions by filling in the ceilings where necessary to hide things that are typically an eye sore or distraction. Again, this depends on the design level you picked in the beginning of this process that was requested to determine how simple of a design you desire or how fancy you want it to be.
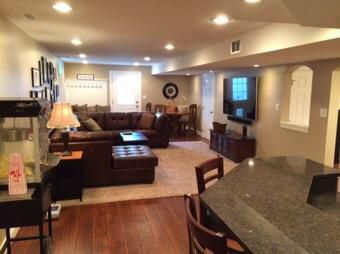
As you can imagine, this is a time-consuming stage of our design process due to the amount of detail I’m now adding as you can now see. Always remember, I work with many clients, and everyone has different taste, and the appearance can range from basic drab and boring to very warm, exhilarating with a fancy touch as well and have that exciting “WoW” appeal. So depending on the design level I’m working in, I may or may not be adding the “wow effect” (design features) to this design as many call it. Another word for cool features and or fancier elements to dress it up more or a lot more. As mentioned, features like archways, art niches, wainscoting, beams, crown molding in other areas and or even stone/brick and or wood finishes on walls ceilings and coffered ceilings to name a few. Also tray ceilings and with or without backlighting using LED rope lighting, like this image shows.

There are so many ways to make ceilings look very nice that can take away the look of a typical drab basement and will also take your eyes off the obvious as an illusion. The more I add, the more time it takes, and this is why you had to pick a design level so that I could allow more time working on your design.
You may see soffiting around and or at the ceilings (architectural dotted lines) like the following image shows;
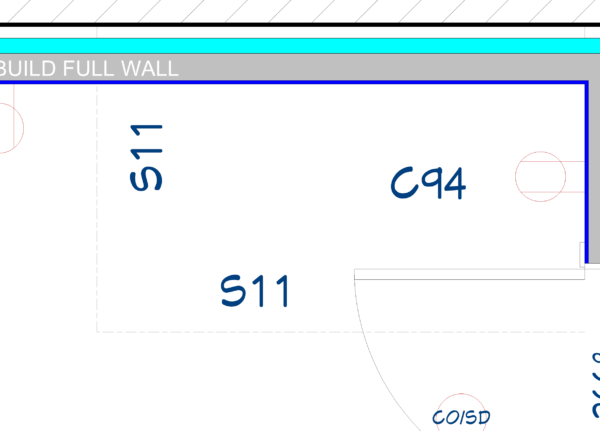
So these dotted lines are followed by the guy framing from your plan. If these dotted lines are indicated and depending on the design level we’re working with, I’m known for hiding things with these framed and drywall drops per say called soffits and many times, additional fake soffits even if we’re not hiding a duct for example. Based on your design level, I may only show the minimum needed and this does not mean we can’t add more at this stage. You are free to mockup a plan to show me things at the ceiling I may have missed due to missing photos and or dark photos. But these soffits once again are indicated with dotted lines called architectural soffit lines and you’ll see my special sub-contractor codes as “S13” as an example. The “S” is for soffit and the number is the distance down from the ceilings approximately. Final framing may adjust this. When this is done the way I do it, you just won’t notice beams, ducts and other objects that are still there especially if I continued the soffit pass the duct, beam or pipe/object. Again, if you want more of the “wow” factor in this, just ask me to add more. IMPORTANT NOTE: When you put more “WoW” in the design, you will also say “WoW” at the construction cost too. LOL
Note: Although you don’t see any legends on this plan right now, you’ll see color codes but these will be explained on the final plan. Just trust I’m just adding the detail at this time as well since I work from area to area. Also, none of this is completely set in stone, I’m just showing you one of many ideas to attempt to NOT make the basement look like a typical basement which I’m well known for. Just let me know what you like and don’t like if at all. If you change your mind, let me know. If at first you didn’t go with a higher design level, I can upgrade this design level anytime if you decide to have me dress this up more in the design level you choose and or quote a small fee to add fancy things over and above the design level first agreed with. If you wish to review for detailed descriptions of each design level with more examples, click this link; https://basementdesigner.com/design-levels/
How does the soffit hide things? Look at this image behind the framing,
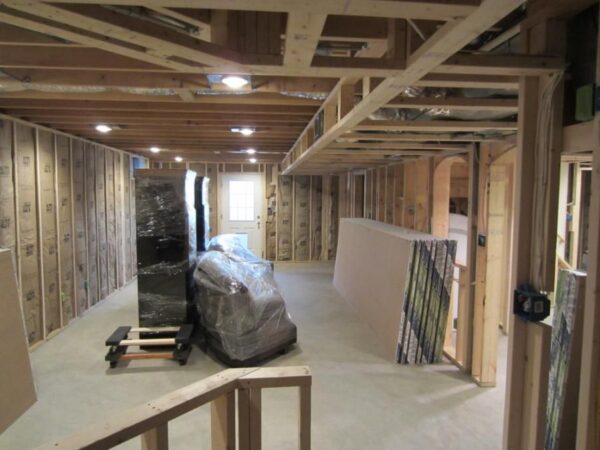
Based on the ductwork, pipes and or beams if any, I attempt to hide these objects. Soffits can take your eyes off the obvious and really help most of the time but sometimes an entire area will look better if all the ceilings in the area are as low as beams/ducts. Also, if ducts or something is in the middle of a ceiling and another section is clear/opened and if it may appear boxy or closed in. Too many variables to go into but trust my expertise in this talent to hide sore thumbs unless you only choose design level A or B. Fake soffits do cost a little bit more to add but worth it if more appealing and for possible future resale value too. Adding fake soffits to continue to the end or wrap around all walls like a tray ceiling can do wonders to the overall “wow” that comes from creating what I consider optical illusions. I can change anything at this stage so let me know what to delete or add. Also, as I may have mentioned, let me know if I missed anything hanging down and or send the missing photos so I may see what I missed.
Visit this link at my website any time to know more about ceilings and soffits and the many types; https://basementdesigner.com/ceiling-soffit-types/ will explain much more.
Since these code numbers indicate only an approximate distance down from the ceilings in inches the actual framing may vary. Some soffits shown are merely built to be optical illusions to help keep your eyes off ducts and beams and some are used to define area’s such as around a bar if any and many other things. A basic finish would not show so many but it will also make the basement appear more as a basement making it more chopped up, boxy looking and more like just a basement that was finished cheaply. Sometimes extending soffits passing where only needed to end walls helps the look even if portions of a soffit are false for a better look. The overall cost for the additional soffits I show if any only adds about 1-4% more to the job cost but let me know if these stay in or should be reduced to a minimum.
Some ceilings are lowered for many good reasons and the appearance is always part of it. Here are a few helpful links at my web site about soffits and what to do before finishing the basement and or building soffits and as for design, it’s important we determine these now;
*https://basementdesigner.com/ceiling-soffit-types/
*https://basementdesigner.com/basement-soffits-build/
* https://basementdesigner.com/basement-finishing-102/
Were you expecting to see suspended ceiling tiles? Read a blog I wrote first; https://basementdesigner.com/drop-suspended-ceilings-vs-drywall/ I was preparing to just do all drywall which is typical and holds the best resale value if that matters to you. Do you want some of them suspended/dropped? For now, I’ll show all the drywall since it’s the most sought after for resale value.
You’ll always see recessed cans (now known as can less LED) used in main focused area’s for lighting (indicated red circle with “R” inside for 6” cans or “R4” (smaller red circle) for 4” cans) but you may not see these used in bedrooms and other standard areas/rooms such as laundry, workout and study’s but feel free to request a change for these in those area’s too if you had this in mind. Just note that one standard overhead ceiling light fixture housing 2 or more bulbs is equal to four of these recessed cans which average 6-7 times more cost to do it this way. Cost depends on the type. A recess can means just that, it’s deep and round and needs space above for heat too.
As mentioned; A newer type is a flat LED that looks like a recessed can light but only needs a couple inches of space and see how much lower the cost in bulk at this link for example; 16 Pack 6 Inch Ultra-Thin LED Recessed Light with Junction Box Yes and not only will these install in most framing under ducts as well, they save money big time on the electric bill. My entire house is all LED lights for this reason. Let me know if you have no intention of using these and I’ll change any I may have placed under ducts to either another location and or add wall sconces and or normal ceiling fixture instead.
All light fixtures are for this virtual planning; the concept in other words but does indicate to the electrician a circuit fixture is present.
Also round red circles with 4 marks sticking off the circle are either normal light fixture or possibly a hanging pendant type you’ll pick out later. All light fixtures are for this virtual planning; the concept in other words but does indicate to the electrician a circuit fixture is present. Also note that all of the red symbols on this attached plan are electrical and part of the IRC code as well and any professional electrician can read this but your final plan will have a legend you can look these up with, ok? I’m not done just yet and need your feedback again on how it’s looking. So let me know if you wish to have me put “wow” to this or start adding more to get the “wow” affect to show.
I’m not done with your plan, I have much more to do on this but at this stage I want to see how this new interior finish is looking to you before I move forward. It’s not an issue to add more to the plan, try something different and or dress up the ceilings more, so just ask me. Please let me know if you need something special or if I missed something hanging low from the ceilings not seen in the images you sent me. Also give me your thoughts on this in other words and if you want something changed. Thanks, and enjoy the updated views and please take enough time to think everything over before providing feedback on this. At any time, I can polish off this plan.
