Please get your favorite beverage and sit back and read through the following information regarding your completed basement design; some of which pertains to understanding your new Completed Basement Design and includes some links of additional information, different topics on your completed basement design and things to think about before you start collecting bids and or start any construction work. Although I’m here for you with construction advice as well and at not additional charge, just remember that my time is valuable. If you need ongoing assistance, you can retain me at any time for a small fee i’ll quote you. Thanks and enjoy reading through this!
First rule of thumb when builder this design I made for you. If you really like the final 3D renderings we worked hard on in the design and how well this design looks, don’t allow any contractor to deviate from the plan and take anything out of it such as soffits, arches, passthroughs and niches if any. They will attempt to talk you out of things just to save them time without really reducing their bid. Soffits for example are not a huge cost depending on the plan and or design level we designed it too but for the overall appearance primarily; they have a purpose and the functionality. So any design features should be thought about before removing them. I’m happy to show you even after the final design, what it would look like with any of the design features we put in taken out. Just ask me before you end up regretting what the contractor suggest. They are not designers, ok?
Basement Supplemental Heating Is A Link To Very Important Information as well; A Must Read! And You’ll Find Out Why Your New Plan May Not Show Code Required Heat Runs and If You Need More Than These Heat Runs Added.
HVAC: I can show the HVAC air vents on this plan if requested but it’s only one per 175 sq ft on average and or per room area located close to exterior walls and or primarily windows. If in a winter colder climate, the windows have a lesser “R” factor and it’s where the cold will come from. Using better insulated window coverings like wood shutters or quilted top down bottom up types can assist in keeping cold air out better as well. If single pane glass, think about replacement windows that area dual pane and more energy efficient.
Combustion Air and Outside Air. Newer homes are being built tighter and more energy efficient every year. Finding the right combination for a forced air system is tough and there are professional ways to have it measured. Naturally, if doors are being open and closed daily, this should be enough in my opinion but if not and you don’t have a HR (high recovery) HVAC or water heater, gas appliances need oxygen to burn and it shouldn’t be the air you need to breath if the house is closed up too long. So yes, I feel a certain size combustion air duct should be coming from outside to near the gas burning appliances but should it be controlled? Absolutely! But I now have seen outside air ducted to a damper going into the main cold air return and only feel this is wasting energy. It has to be wasting it because in the winter, why would you want sub temperatures sucking in right before the fire burns it? Isn’t it more efficient and faster to heat the existing air in the home? Of course but that’s me and one must follow code regardless! Same with the summer months, why pull in temps over 90 degrees F to your AC coil? Make it work harder? Seems to me. Here’s some good reading I found about this; A Homeowner’s Guide to Ventilation: Don’t Leave Fresh Air to Chance
2021 International Energy Conservation Code (IECC)
R402.4.4 Rooms containing fuel-burning appliances.
In Climate Zones 3 through 8, where open combustion air ducts provide combustion air to open combustion fuel-burning appliances, the appliances and combustion air opening shall be located outside the building thermal envelope or enclosed in a room that is isolated from inside the thermal envelope. Such rooms shall be sealed and insulated in accordance with the envelope requirements of Table R402.1.3, where the walls, floors and ceilings shall meet a minimum of the basement wall R-value requirement. The door into the room shall be fully gasketed and any water lines and ducts in the room insulated in accordance with Section R403. The combustion air duct shall be insulated where it passes through conditioned space to an R-value of not less than R-8.
Exceptions:
-
1.Direct vent appliances with both intake and exhaust pipes installed continuous to the outside.
-
2.Fireplaces and stoves complying with Section R402.4.2 and Section R1006 of the International Residential Code. Always be sure to check if there’s any updates to the codes I mentioned here.
Structural Engineered Wood or Concrete Floors (with a crawl space under it)
Note; if I suggested installing mechanical floor vents on your completed basement design due to having a structural wood/concrete floor, please read over this link; Basements With Crawl Spaces
Using this scaled plan, FYI:
As for dimensions and detail dimensions, all framing contractors along with all other contractors know what a scaled plan is. Using the ¼” per foot scaling they merely use their ruler and can lay out their wall framing and just about anything off the plan. This is why you don’t see dimensions all over the plan for each and everything and the reason you must print out the full scale PDF file I sent you on 24×36 inch paper. As stated, any professional framer/carpenter will use this scaling by using their tape measuring device reading 1/4″ as a foot (12″) to figure out all wall lengths. Each 1/16″ mark is 3″ as well and they mark the floors and square up all walls using a chalk line tool to snap where the walls go. Red chalk can be seen better to me, some use blue but the color you use is up to you. The perimeter walls can be marked to where the interior side of any framed walls from the foundation walls which are somewhat square already and base on your plan configuration and the note about the walls on the plan but always per code. If you build walls pressing in on any blanket wrap, it won’t insulate as it should in other words.
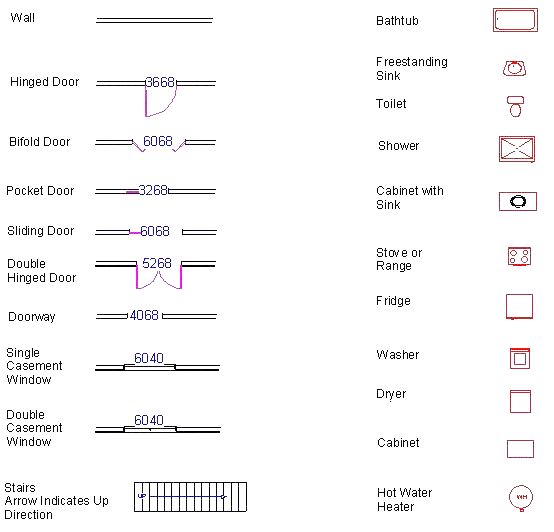
Blueprint Symbols Diagram
Note: All the doors and windows shown below are marked with numbers such as “3068”. These numbers specify the width first and height secondly for the doors and windows. For example: “3068” for a door means that the door is 3’0″ wide by 6’8″ high.
NOTE: If layout drawings are attached as PDF marked (24×36), they are meant to be printed only on Architectural D (24″x36″) size paper. Printing on any other size paper will invalidate the drawing scales and could make the text illegible and complicate construction practices.
Hire A Professional To Frame
This is a custom design and requires professionals to build it that know how to read the plan and use it. If you have built ins such as arches, soffits, an entertainment center, bookcases and so on; in most cases, you have to play it by ear on this as to how the shelving and such will work out and fit exact before and after framing it. As noted on the plan, these views are only for concept and actual framing will vary but these views are to scale and may provide more insight for whomever frames to fully understand why you expect the outcome to fully show your completed basement design appearances. And don’t allow any contractor to talk you out of any of the details such as soffits and archways. They are just lazy and looking for short cuts. As for your master plan; again, a professional framer knows what to do here. During the time I design this plan, I gave you 3D rendering views on the interior. This too is for all workers so they know how you want this to look and have them bid the work accordingly. These plan 3D rendering print outs can also be placed in clear plastic holders on a larger binder ring kept in the construction zone for all to view as needed. Subcontractors will soil the plan over time making it harder to read possibly and it’s a good idea to laminate it. If you’re a DIY person or playing general contractor, I admire this as I once tackled jobs I never did before and learned by just digging in. Yes, you’ll make errors but isn’t that how we all learn sometimes. As for counting materials, I may have provided a materials list also mentioned below where I explain more about using it.
Here’s a tip I wrote; Basement Soffits and How to Build them
Ordering Cabinets
During or after the design process, we can make a couple cabinet product lines fit that I am a Manufacturers Authorized Representative for. Ready-made to fit stock cabinets will save money over having custom-made cabinets. Great low pricing for a very well-made product that is all wood, has silent drawer and hinge hardware and dovetail wood drawers. Reason for the lower cost? They are Ready to assemble (RTA) meaning they are shipped to you in flat boxes like Ikea does and you put it together. The following link is the Jarlin Cabinetry catalog to the construction features and door styles to choose from; https://catalog.jarlincabinets.com/flipbook/ and this following link is to the Eurocraft Cabinetry which is a true European built style meaning frameless and same quality features except ¾” wood construction instead of Jarlin’s ½” wood parts but more customizable yet of course more costly; https://catalog.eurocraftcabinetryfl.com/flipbooks/sig/ just ask me to give you a free quote after the preliminary or final plan is decided. I can also link you to many YouTube videos on how to assemble them when the time comes.
Ordering Cabinets Ahead Of Time
After framing, you’ll need to take your exact dimensions down to a place like Home Depot, Lowes and or any cabinet supply business such as myself to detail your cabinet layout. Although there are cabinet codes on the plan and the requested materials list; this is concept once again and cabinet code and type, style, wood type and so on will vary and or change since this has not been defined yet. The plan is used for where electrical and plumbing goes primarily and the configuration of each area as well as to make the designed bar area work but you can pick out a different type of cabinet such as all drawers or door only for example. These design centers have a different CAD program that I used many years that accurately pin points all cabinets needed once laid out using the framing dimensions (after framing) you bring to them, they can define not only the order for your cabinets (typically 4-6 weeks) they define brand, stain color and wood type as well and please don’t forget the bath dimension as well. Never order cabinets until this is done and make sure they allowed for drywall thickness where applicable. Once again, the plan although scaled and very close to what’s there is still not accurate enough to order anything from until you confirm the wall framing measurements. Even carpet/flooring installers will not come out to measure until at least all the framing is in place.
Reading cabinet codes
On residential drawings, particularly in association with the National Kitchen and Bath Association (NKBA), base cabinets are shown as dashed lines, and wall cabinets are shown as solid lines (See Fig. B). Unlike in commercial drawings, wall lines on residential plans are typically filled in except where a door or window is shown.
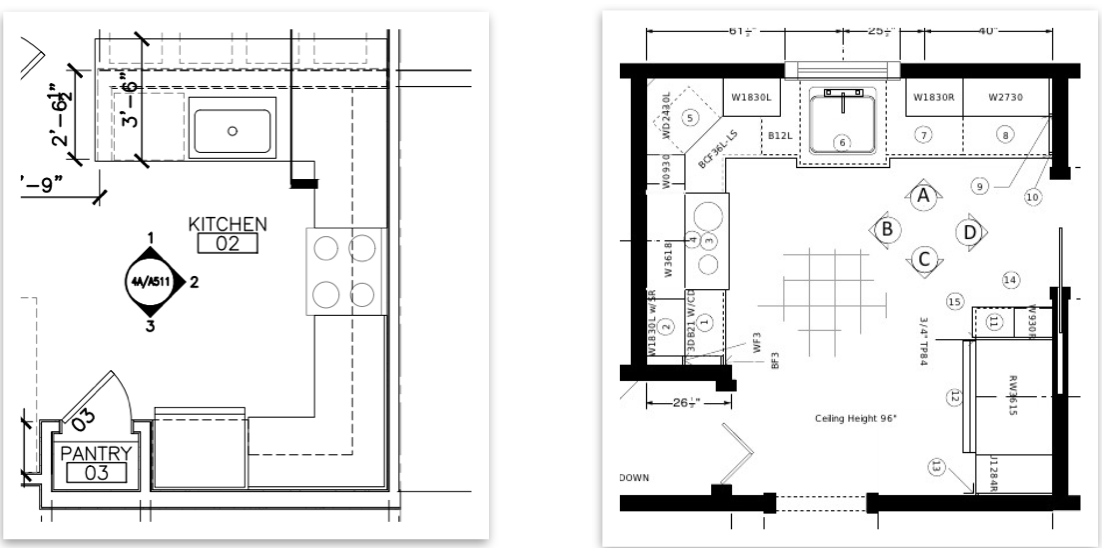
To indicated specific cabinets, nomenclature is shown to represent the type of cabinet and size or width and height. Depending on the manufacturer, cabinets are available in various width increments as well as height for wall cabinets and tall cabinets. For instance, on a kitchen floor plan, you will typically see a base cabinet labeled SB36, B30, 3DB24, and W2442. What the nomenclature above means:
- SB36 = SB stands for Sink Base and 36 means the cabinet is 36” wide.
- B30 = B stands for Base and 30 means the cabinet is 30” wide.
- 3DB24 = DB stands for Drawer Base, 3 in front means it there are three drawers on this cabinet, and 24 means the cabinet is 24” wide.
- W2442 = W stands for Wall, 24 means the cabinet is 24” wide, and 42 means the cabinet has a 42” height.
Cabinetry
There is a multitude of cabinet styles depending on which manufacturer you are designing with. Within each manufacturer, there are a variety of overlays, door styles, wood species, and finishes.
Tip: If you’re handy, some places sell knockdown cabinets just like the ones I offered that you can put together yourself, it can save you money if you have the time. Just ask me for a free quote.
The source above is from the following link to read more about; Understanding Floor Plans and Cabinetry
Reading The Plan Electrical Layout
Electrical symbols are defined on a legend on your plan and may not show all of them but any professional electrician knows these and how to wire your custom design. They will also determine if a sub panel circuit breaker box will be needed based on your current supply panel and they will determine as well the location of such typically in an unfinished area. I don’t show these sub panel boxes on the plan other than a possible subcontractor code as a suggested location and since I don’t know your current set up but I may have shown your existing one. Low voltage is noted as symbols such as TV, cat7/TV and or even a thermostat symbol and the suggested locations for these. Speaker wire and or other low voltage wiring are optional based on your needs.


Those with a line through them are a switch. No, this does not mean money! They’ve made the mistake over the years not using the double line dollar bill (cifrão) symbol;
or the “$” typical keyboard shortcut dollar symbol or like the one with the line not all the way through it I think because this red plan symbol has always been the standard symbol for an electrical switch.
Any switches with a “DM” is dimmer switch and the very small red circles are mini recessed can lights and or can be halogen type and if ductwork is in the way for a deeper unit, try puck lighting. Larger red circles with an “R” inside is the normal 5-6″ recessed can light. I’m a former journeyman electrician and can only assure you that your lighting layout is top notch but due to items and obstacles unseen, your electrician may have to adjust the locations of electrical items on your new plan accordingly. Heed the call; only the installing professional knows exactly how to read this plan and symbols as well as hook these up and where they should be mounted.
Many YouTube Videos On Installing Electrical; How to Install Recessed Lighting (NEW CONSTRUCTION)
If your plan shows recessed lighting where you may have an air duct or some type of obstacle in the way, more projects are being finished now with Canless LED Light Fixtures.
This type fits in the framing typically under ducts and so many other places traditional recessed cans won’t fit. I suggest a bit more slack on the romex wire, and enough held with a quick release fastener of some type to allow you to reach and access this junction box in the future in case of replacement parts/repair when needed. You may see that most types have a quick removal plug so you may replace the LED unit if ever it burns out but the power supply inside the junction box may be the issue down the road.
Speakers Not All Shown On Plan
Although I may show an “E10” code on the plan for “other speaker locations” if any, I don’t show any locations for the surround sound other than the “E2” code meaning that conventional Dolby 5.1 (5 speakers plus subwoofer) or 7.1 (7 speakers plus sub woofer) surround is to be installed there and this choice is up to you regardless. Read below about other amazing Dolby systems using Dolby Atmos including Dolby 9.1 now if you wish to immerse into your listening experience. In any case, I always suggest to my clients to get a few theater pros out which can include the ones from Best Buy if available; pick their brains and opinions as to where speakers and types should go as a free estimate even if you’re going to put speakers and wire in yourself or use wireless types. The pro advice is worth doing it this way and having those free estimates to be sure and a budget amount quote to boot. I could suggest all these surround sound speaker locations like I may show for single speakers but I really don’t want to be blamed if it doesn’t sound right to you after all that work. LOL I may have shown an optional surround sound wiring as a noted code on your plan for example; this merely means it could be installed in that area and it’s your choice of course. A professional theater installer needs to be consulted after framing once again and only he can help determine the actual placement of any audio and or video devices.
Surround sound has gone to levels I can’t imagine any longer. Meaning you can surround yourself in sound for starters and go beyond conventional surround systems.
“Dolby Atmos has reinvented how entertainment is created and experienced, allowing creatives everywhere to place each sound exactly where they want it to go, for a more realistic and immersive audio experience.”
Dolby Atmos setups
Dolby Atmos layouts parallel the traditional 5.1 and 7.1 surround sound setups and add height speakers. Adding two height channels creates a 5.1.2 or a 7.1.2 system. Dolby Atmos systems with four height channels are designated 5.1.4 or 7.1.4.
- A 5.1.2 or 7.1.2 system uses two ceiling speakers, or two Dolby Atmos-enabled speakers or modules.
- A 5.1.4 or 7.1.4 system uses four ceiling speakers, or four Dolby Atmos-enabled speakers or modules.
- A 9.1.2 system adds a pair of front wide speakers to a 7.1.2 layout.
There are two basic ways to add the height channels. One is to use two or four in-ceiling speakers. The second way is to use special Dolby Atmos-enabled speakers that can be floor or stand mounted. From a placement perspective, these replace the left and right speakers and the left and right surround speakers.
See the Dolby Atmos speaker setup guide for more detailed information. Download both the Dolby Vision and Dolby Atmos home entertainment setup guide PDF
9.1 Virtual speaker setup at a glance.
Read more here; Dolby Atmos – Official Site
Want to know more about home theaters? Click this link; How to Build a Home Theater
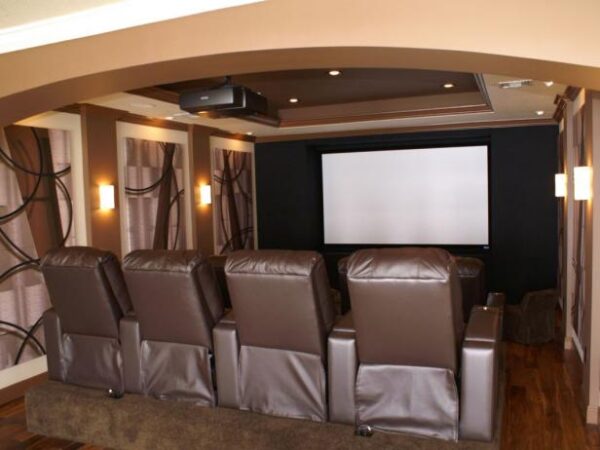
You have to admit, I’ve taken enough responsibility for assuring this plan will work as it is not to mention I wasn’t really hired to design your sound system. Agree? If I design a private home theater room, I only make sure that the shape of the room is as recommended for sound, nothing more and the same principals apply as above, that professional should step in at this point.
CEILINGS
I always feel drywall is the best looking material to use and it will provide the best resale value for your home. You’ve seen many of my designs at my web sites showing how nice they look. Also, code does not say you can’t use 5/8″ fire rated drywall if you are concerned about a longer 45 minute burning time in case of fire. Note: 1/2″ drywall is rated for only a 20 minute burning time. If your intentions are to use a dropped ceiling tile or material, read the following on my thoughts on this;
DRYWALL CEILINGS NOT SUSPENDED ONES
As I may have mentioned, I don’t suggest suspended or drop ceilings/ceiling tiles in basements for many reasons. One good one is that you’ll lose value to your home. Ask any realtor; they should tell you that buyers prefer drywall ceilings in the basement to match the upstairs! Here in Denver and many other parts of the country we’ve learned that there’s no reason to have access to anything if the home was built right and is insulated right and nothing is leaking. Access to shut off valves and such can be moved to unfinished areas or you can install these new plastic access plugs that are 4-6 inches and clip into a drywall opening you make making it a clean look. Saddle valves for icemakers upstairs should be relocated to an unfinished area such as the furnace room for example. If you’re worried about running wires at a later date, this should just be roughed in now with all planning in place. Dropped ceilings make the space feel more closed in as the ceilings are a bit lower then they need to be and can look like more of a mobile home or office and not like your home in any way. Drywall is cheap to install, repair and bottom line, just looks a lot better. https://basementdesigner.com/drop-suspended-ceilings-vs-drywall/
Flooring Materials
I may not show on your plan where and what material to use for your flooring but I suggest always using waterproof material at best such as Luxury Vinyl Laminate (LVL) where possible if for a basement on slab. Basements are prone for flooding and or water leaks and if vinyl flooring and or ceramic was used, replacement is not the concern. Engineered and or wood based laminates that are NOT classified waterproof but only water resistant can still be an issue if flooded. Carpet is great and is typically the cheaper of all materials to cover your floors and helps keep the basement warmer as an insulation yet a mess if flooded. Some clients are clear coating/staining and or painting there floors only. If so, you still have expansion joints to deal with and concrete expands and contracts so cracks will show up at some point in time. Wood flooring, no matter if calling it laminated or engineered wood, these can be installed right on top of concrete using a thin foam barrier. This type of flooring is nice in many areas and also provides a sort of insulation factor too. I do not suggest any solid wood products including laminate flooring which has a wood particle material backing to be used in baths, bars, kitchens and at entryways having walkout doors. These areas should have a waterproof material such as ceramic tile, marble or a sheet vinyl material once called linoleum. but certain wood products claim to be at least water resistant to some degree if you must have wood.
Have you seen a solid wood floor in a bath after a toilet overflows? It’s not a pretty site when the wood buckles up and bends.
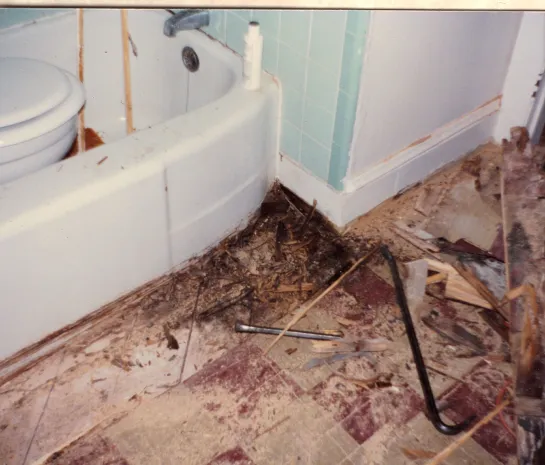
Bars for example look nice with a wood floor but if any liquid is spilt, it can cause warping and buckling as well to the material. Worst of all, if beer or wine is spilled onto the floor and gets into the material, it will later on smell of stale malodorous beer and such. I’m sure at one time in your life, you walked into a bar or club that had this smell, this is why you don’t want to consider wood flooring material at especially the bar. Baths if having a toilet and or shower/tub, its highly suggested to use a waterproof material. Imagine the nightmare again of a toilet backing up or bathtub overfilling and what happens to wood flooring as mentioned above. The LVP or laminated Vinyl Plank flooring (best to use on basement cement floors) is the most water/moisture resilient yet based on the one you pick out and once again, works well in basements tremendously holding up to moisture and some even water flooding.
Never forget; standard basements with normal concrete floors can fill up with water if you have a pipe freeze and thaw out and or any major leak upstairs even if you have a floor drain in the basement and it’s the sewer system backing up or the leaking water can’t reach that one floor drain easily or fast enough. A common washing machine hose and I mean the hot water one mostly (heat weakens rubber faster than cold water), is very well known to fail and bust open (unless steel reinforced type) and if you believe in Murphy’s law; things like this and ice maker lines busting open only happen when you’re away on vacation, right? Carpet and padding can be taken outside to air out and or aired out with fans but what a mess to clean up. As always and in most cases, tile, stone and or ceramic type floors will be just fine after the water is removed with a wet-vac or hours of mopping up, but wood, well, just think about it and the fact this is in the basement, lower level; don’t get me wrong, I love the look of wood flooring!
Wall materials
Once again and since I’m the designer for you space and not the interior decorator, I may not show what goes in a shower or bath wall areas such as tile as well as any backsplashes at bars or around sinks. I do suggest the same with flooring in those areas and to use waterproof or water resistant materials such as ceramic tile, marble, DuPont™ Corian® which is not just for countertops; makes a great shower wall, shower seat and or any product that resist water and mildew. Another nice one for showers and such is Quartz Wall Panels. All other walls need to have at least 1/2″ drywall to meet the IRC codes even if you cover these walls with a wood paneling and or a wood veneer product. If the wood is 3/4″ thick T&G tongue and grove, check with your local building department if it’s allowed in lieu of drywall. Baths and kitchens require a moisture proof drywall also known as GP green board or M-Bloc. It is not water proof, just resistant and if you want something more durable against water, use Cement Board Drywall.
Feel free to always ask me questions pertaining to your plan and building by sending an email. I’m happy to provide advice. I did construction contracts for over 35 years if you wish to have me review any to catch a contractor cheating you out of something and or low balling a bid. Just ask; I can explain more if need be and you can retain additional services from me for any consultation and or guidance.
Accessible Panels Or Access Doors (Also Noted On Plans As F7)
Access doors by the way have many options. For views, I show the wood grain or dark look on these access doors first time around but mainly to make sure you see where these are and unlike your upstairs that doesn’t show these, it is after all still a basement and many of your controls to the entire house are down there along with the heat source and hot water. So in basement design it’s typical to see access panels or doors.
At best, the MDF panels (paint grade material) with hinges are the lowest cost to build and normally they are painted the same as the trim color which might be white. Some clients paint them the same as walls and this looks better especially if faux painted. There are different types of access doors including flush types using a metal drywall channel, but I will add that you’ll see this slight gap for the opening. The main water shut off could also just be a full door like I show on the crawl space access if any. This creates an optical illusion that there’s either a closet there or another room which I feel is far better to look at than an access panel half way up pointing out the obvious.
WATER HEATERS
Finishing a basement requires additional thought for future planning too and one item that is overlooked is the water heater. Some clients wish to change this out to a thankless unit which can be great yet costly depending on the model and the demand needed for hot water and more costly especially for gas fired units requiring venting as well.
Well another issue to consider is that the demand does increase if I’ve added another bath or two. Yes, you can replace a tank with a larger one or have me revisit the plan to add a 2nd tank but this should be hooked up in series not in parallel (typical plumbers logic) meaning the hot coming out of the first one runs to the cold inlet for the 2nd one. This makes the first one work as a pre-heating unit which can run with the temperature turned down lower to do just that, pre-heat the water running into the 2nd one before going to all fixtures. Read the following source from PlumbingSupply.com
“ALWAYS install them in series. Water is lazy and it will take the easiest route. When they are in parallell, regardless of how “equal” the piping appears, internal conditions can change the equality, and then one heater will become the lead one and expend its water faster. Once that happens its cold water will blend with the other heater’s hot water and temper it. With series EVERY ounce of water has to flow through both heaters so the output temperature remains the same until both heaters have used their hot water. It also means that all the water is subjected to the full btu input of both heaters. It also means that both heaters do not have to be identical models. And when failure occurs in the first heater, it is less of an economic burden to change one than to get hit with a bill for two heaters at the same, or nearly the same, time.”
Another way to get more hot water without replacement is by adding a supplemental electric tank-less water heater to the cold inlet on your tank. Sounds weird at first but it can pre-heat the cold water filling the tank on demand; you most likely wouldn’t feel it run out of hot water. These come in many brands and different wattages and can be bought at a Home Depot type of place or online such as this 9500w Bosch unit at this link; https://www.zoro.com/bosch-electric-tankless-water-heater-208240v-us9/i/G2203381/ and for under 200 bucks. Or this Rheem 9000w unit at this link; https://www.zoro.com/rheem-electric-tankless-water-heater-240vac-rte9/i/G4376032/ Any of these units will commonly require a 240VAC 40amp circuit on the plan, some based on the wattage may be less amps or more. Common wiring is using a #8 AWG gage wire but merely size this to the unit you select. Some even capable of supply hot water for a 4 bathroom house I think with a 13000W Commercial Electric Tank-less Water Heater found at this link for 250 bucks; https://www.zoro.com/rheem-electric-tankless-water-heater-240vac-rte13/i/G4376023/ This needs a 60 amp breaker using a #6 AWG wire size.
If you think electric cost is worse than gas, read this; http://www.gotankless.com/compare-gas-electric-tankless.html
You may decide to size a tank-less unit to just replace the old wasteful water tank. Always keep in mind that a tank is storing the hot water and keeping at the desired hot temperature even when you don’t use it like during the night or at work or on vacation. Constantly heating up to just keep the water ready at the temperature desired even when you don’t need it. Hot water heater storage tanks just waste energy and of course money.
My Support Service
I provide support for as long as you need me and in most cases, at no additional cost. As mentioned; I can also review any contracts you consider to sign as well as provide a rough materials list. I have clients working on their basements for over two years and I keep back up files of backups so I never lose your information. You can ask me questions anytime and I do know construction very well, not just designs. I’ve been doing this for over 38 years now and If you don’t wish to use this part of my service to you, just make sure any contract you sign states that they will “Provide materials and labor to build the basement “AS PER PLAN” and you have them sign an approved plan along with the contract for your records. I do this for my local guy to protect my clients. Anyone that won’t agree to do this is planning on cutting things out of the job to do it for the price they offered (which seems lower or best at first) and so you can’t hold him to building it “AS PER PLAN”. They will most likely be shorting you on many things which can include archways, built-in’s, cabinets, bath fixtures (or have amount/allowance too low), missing flooring and so on.
When I do contracts I make sure the amount allowed is indicated somewhere at reasonable pricing and or allowances that you use to pick out your finished materials that really work. A typical trick from contractors is to show an amount you may think will work and they come back during the job (after they have half your money) asking for more money. You’ll end up paying a lot more by the time the dust settles and you add it all up. I don’t allow this at all and most of all; I like to see written in that “NO VERBAL AGREEMENT IS ACCEPTED” Sure they may say they will do it but handshakes are not like they use to be many years ago and to also show the brand of fixtures/finished items being installed. Go price bath fixtures before signing anything to make sure the total allowed will work. Anyway, just ask me anything about contracts and or any advice you need, I’m here for you as part of my design service.
After having a nice basement design done by me, many thoughts come up including additional ideas of course since you now have a new vision of your space. It’s highly recommend that you make the contractor or whomever builds it follow the plan to achieve the appearance you liked in the views sent. But changes can be made and I’m here if you need the plan changed due to newer framing ideas and or locations of walls, doors and items like that only to reassure that everything fits well. As per our agreement, I may charge for the change based on complexity. Just ask me!
The Material List if Requested or Attached
The material list counts everything in the design but the CAD thinks I’ve drawn a house with an exterior as well and prepare to edit this excel file. Always keep in mind that the material planner I send comes from the drawing but the CAD program does not know which materials are already there such as existing walls, windows, electrical and the ceiling joist and or floor for example. I do use different walls types to try and help make this show up on the list to help separate all walls needing drywall from those that will also get rock/stone/tile and or wood veneer on them as well so you’ll need to cross out things that won’t have a bearing on your basement finish. Things like sub flooring, ceiling joist, exterior items and even windows and doors that are already in place. It does count the electrical well but I’d rethink some of the other items. Like the cabinets are counted per the design but you really need to take framing dimensions down to a Home Depot kind of place where they can define the final cabinets going in using even a cabinet design software for better accuracy and their CAD program will also do a materials take off for this entire plan for you to assure the cabinet order has no errors on it. Under wallboard, which is drywall, it may show number of sheets but also shows total sq. ft. which you divide by 32 for a 4’x8′ sheet or 48 for a 4’X12′ sheet to determine square footage and or how many sheets. I’m just not that sure how accurate some of these items are since I didn’t program this in the CAD software and this planner would only be most accurate if the drawing was an entire house being built but it never hurts to double check against what you see on this planner; again, it is why I made it to be edited by you and I’ve provided it only as a tool to assist you better with.
It will show total board feet for moldings and how many doors and types of cabinets as well. It does count electrical very well in your completed basement design as anything that has electrical in the plan with nothing to do with the exterior, ceiling joist and or floor construction. Finished materials should be accurate and or close such as carpet, tile and bath fixtures for example but I’d still have a carpet guy figure this out if he does free estimate and most contractors will give you free bids which provide you a document with their figures on it.
It should count studs with sill plates but any framing attaching to concrete must be pressure treated lumber and it may or may not show this different lumber type. Please edit this list if so. If you have a concrete floor, you’ll have to add the board feet up manually for pressure treated lumber needed per code unless you have a wood floor and subtract from the total lumber. It’s an excel spreadsheet you can edit as well and add cost into. Tip: I always built my framed walls in 12 foot sections. Overall, it should make for a good guideline you can edit and something to add corrected amounts on as well as pricing.
You may always write me with any questions anytime. Also review the earlier link I sent after your first design was made, it may help answer some other questions as well; BASEMENT DESIGN INTERIOR FINISH And don’t miss reading my current blog; Basement Finishing 102 and or How To Finish A Basement if you’re a DIY’er (do it yourself person).
Thanks again for allowing Basement Finishing & Design Service to design your project.
